
Calibrating my displays, as I spoke about in my last post, solves the colour‑accuracy problem, but it creates a new one: I don’t want to live full‑time in “calibrated mode.” It’s perfect for photography, but non‑colour‑managed applications look muted and subdued. I miss the punchy contrast and saturated colours of my monitors’ brighter showroom configuration. My Samsung LC27JG500QQUXEN panels only expose those settings through an on‑screen menu driven by a tiny joystick, which is fine if you change things once a year and intolerable if you need to switch modes several times a day. The idea of jotting down my calibrated RGB and brightness values for each monitor, nudging the joystick through a maze of menus for “office mode,” then reversing the whole process every time I open Lightroom or Photoshop feels ridiculous. I need a way to switch states instantly – without touching the OSD at all.
That frustration pushes me to look for a way around the on‑screen menu entirely. I know monitors expose some settings over USB or HDMI for corporate fleet management, but I’ve never connected that idea to colour work. That’s when I stumble across DDC/CI – a VESA standard that lets software talk directly to a monitor’s internal registers. Brightness, contrast, RGB gains, input selection, power state: all of it can be queried and set programmatically, bypassing the OSD completely.
The next question is whether my Samsung panels actually support it. Many monitors claim DDC/CI compatibility but only expose a handful of controls, or worse, expose them inconsistently across inputs. To find out, I turn to a tiny NirSoft utility called ControlMyMonitor. It enumerates every VCP (Virtual Control Panel) code a monitor reports, shows the current value, the allowed range, and whether the monitor accepts writes.
Opening it for the first time feels like lifting the lid on the hardware. Instead of a joystick and a maze of menus, I’m presented with a list of raw registers.
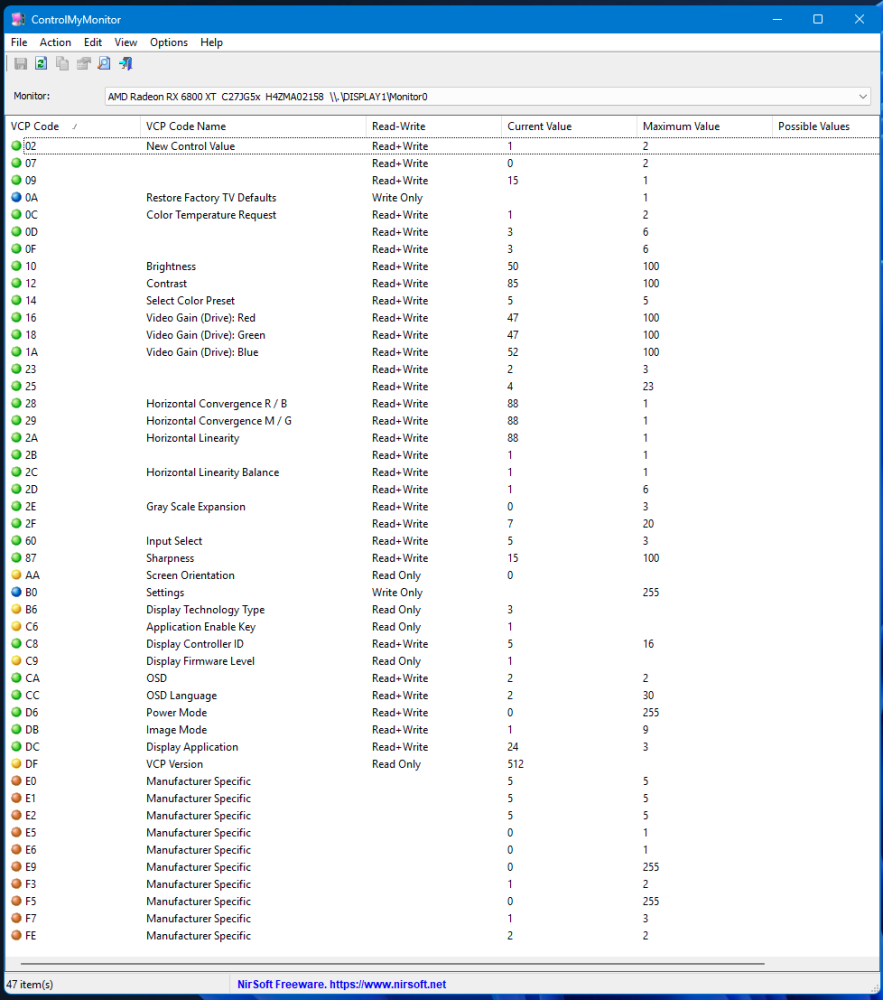
Changing a value in the UI updates the monitor instantly. No OSD. No joystick. No fuss. And crucially – surprisingly, even – every control I need for both calibrated and office modes is writable: brightness, plus the individual gain values for each RGB channel.
Now that I know the registers are writable, the next step is to script them. ControlMyMonitor includes a full command‑line interface, and every monitor can be addressed using a unique identifier. Pressing Ctrl+M inside the utility copies a block of metadata – device path, model name, serial number – and any of those strings can be used to target a specific panel
Monitor Device Name: "\\.\DISPLAY1\Monitor0"
Monitor Name: "C27JG5x"
Serial Number: "H4ZMA02158"
Adapter Name: "AMD Radeon RX 6800 XT"
Monitor ID: "MONITOR\SAM0F56{4d36e96e-e325-11ce-bfc1-08002be10318}\0006"
Short Monitor ID: "SAM0F56"
With that in hand, issuing commands becomes trivial. Brightness maps to VCP code 0x10, contrast to 0x12, and the RGB gains to 0x16, 0x18, and 0x1A. A single line like:
ControlMyMonitor.exe /SetValue "\\.\DISPLAY1\Monitor0" 10 70sets the brightness of my first Samsung to 70. Another line sets the red gain, another the green, another the blue. Suddenly the fiddly joystick is irrelevant — I can assert a full calibrated state, or a full office state, across both monitors in under a second.
After a little working out how to reference the monitor ID, I land on the block below, which returns my first monitor to its calibrated state from whatever the OSD menu settings have previously been set to:
rem === Calibrated Mode ===
ControlMyMonitor.exe /SetValue "H4ZMA02158" 10 17
ControlMyMonitor.exe /SetValue "H4ZMA02158" 16 48
ControlMyMonitor.exe /SetValue "H4ZMA02158" 18 56
ControlMyMonitor.exe /SetValue "H4ZMA02158" 1A 46
Brightness, then red, green, blue gains – each one a direct write to the panel’s VCP registers. No joystick, no menu diving, no risk of drifting away from the values DisplayCAL expects. The calibrated state becomes something I can restore instantly, reliably, and without touching the monitor at all.
From there, the idea expands naturally into a toggle system. I build a small batch file that reads the current brightness of my primary monitor, decides which mode I’m in, and applies the opposite state to both panels.
@echo off

ControlMyMonitor.exe /GetValue "H4ZMA02158" 10
set brightness=%errorlevel%

if %brightness% LSS 30 goto office
goto calibrated

:office
rem === Office Mode ===
ControlMyMonitor.exe ^
    /SetValue "H4ZMA02158" 10 50 ^
    /SetValue "H4ZMA02158" 16 47 ^
    /SetValue "H4ZMA02158" 18 47 ^
    /SetValue "H4ZMA02158" 1A 52 ^
    /SetValue "HTOM903494" 10 50 ^
    /SetValue "HTOM903494" 16 47 ^
    /SetValue "HTOM903494" 18 47 ^
    /SetValue "HTOM903494" 1A 52

echo HIGH > C:\MonitorState\mode.txt
echo Office mode applied.
exit /b

:calibrated
rem === Calibrated Mode ===
ControlMyMonitor.exe ^
    /SetValue "H4ZMA02158" 10 17 ^
    /SetValue "H4ZMA02158" 16 48 ^
    /SetValue "H4ZMA02158" 18 56 ^
    /SetValue "H4ZMA02158" 1A 46 ^
    /SetValue "HTOM903494" 10 18 ^
    /SetValue "HTOM903494" 16 47 ^
    /SetValue "HTOM903494" 18 56 ^
    /SetValue "HTOM903494" 1A 42

echo LOW > C:\MonitorState\mode.txt
echo Calibrated mode applied.
exit /b
The toggling function works beautifully, but running a .bat file manually still feels a little clunky, and some kind of mode indicator would be nice. The goal is a colour‑mode toggle that behaves like a native part of the desktop: one click, instant feedback, and a clear indication of which state the monitors are currently in. That’s where AutoHotkey comes in.
The first step is to give the toggle a sense of memory. I create a mode.txt file alongside the batch, containing either HIGH or LOW, depending on which state has just been applied. The AutoHotkey script calls the toggle function in the batch file, waits a couple of seconds for the monitors to finish applying their new VCP values, reads mode.txt, and updates its tray icon accordingly.
A pair of small PNGs completes the idea: one green, one red, each styled after the X‑Rite logo. Green means calibrated mode is active. Red means office mode. The tray icon becomes a tiny, always‑visible reminder of which mode I’m working in.

The result is a tray-resident, single‑instance script that sits in the tray, switching modes and updating its icon instantly when clicked. It turns the whole colour‑management workflow into something that feels almost native.
#Persistent
#Singleinstance Force
Menu, Tray, Add, Toggle Mode, Toggle
Menu, Tray, Default, Toggle Mode
Menu, Tray, Click, 1

Gosub, UpdateIcon
return

Toggle:
Run, C:\MonitorState\toggle.bat, , Hide
Sleep, 2000
Gosub, UpdateIcon
return

UpdateIcon:
FileRead, mode, C:\MonitorState\mode.txt
mode := SubStr(Trim(mode), 1, 1)

if (mode = "H") {
Menu, Tray, Icon, C:\MonitorState\red_xrite.png
Menu, Tray, Tip, Office Mode
} else if (mode = "L") {
Menu, Tray, Icon, C:\MonitorState\green_xrite.png
Menu, Tray, Tip, Calibrated Mode
}
return